
Asset Workflows
Workflows are guided actions for recording an asset handover or a change in its lifecycle. Use the workflow menu to assign, return, transfer, send to repair, mark lost or stolen, retire, or reactivate an asset.
What workflows are
A workflow walks you through a common asset task one step at a time, makes the right changes to the asset for you, and records what happened in the asset's history. You do not have to remember to update the status or clear the assignee by hand – the workflow takes care of that.
You can start a workflow from three places:
- The Run workflow button on an asset's detail page.
- The right-click menu on any row in the asset list.
- The bulk action bar, after selecting assets. See the limitation below before using it.
Checking an asset out (Assign workflow)
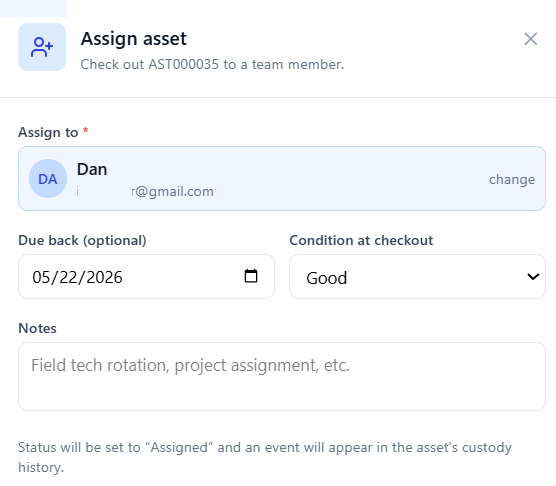
Use the Assign workflow when you hand an asset to a team member – for example, issuing a laptop to a new starter.
- 1Open the asset's detail page.
- 2Click Run workflow, then choose Assign asset.
- 3Pick the team member you are assigning the asset to.
- 4Optionally set a due-back date – the date you expect the asset to be returned.
- 5Optionally record the condition at checkout and add any notes.
- 6Click Assign.
The asset is checked out to that person, its status changes to your organization's assigned-type status, and the handover is recorded in its custody history. The exact status name can vary by organization.
Checking an asset back in (Return workflow)
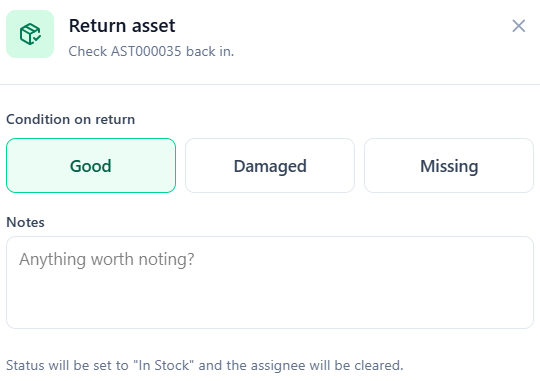
Use the Return workflow when an assigned asset comes back.
- 1Open the assigned asset's detail page.
- 2Click Run workflow, then choose Return asset.
- 3Choose the condition on return: Good, Damaged, or Missing.
- 4Add any notes about the return.
- 5If you chose Damaged or Missing, an "Issue a ticket for this" option appears, switched on by default. Leave it on to create a support ticket for the damage, or switch it off to skip.
- 6Click Return.
The asset is checked back in, its assignee is cleared, and the return is recorded in its custody history. The status changes to your organization's available-type status (often In Stock).
Other available workflows
Open an asset and choose Run workflow, or use its row menu in the asset list. The options shown depend on the asset's current state: Return and Transfer appear when someone holds the asset, while Reactivate replaces Retire for an asset in a retired or disposed status.
| Workflow | When to use it |
|---|---|
| Transfer | Move an assigned asset to another holder. Choose a team member or contact, record its condition, and leave a handover note. |
| Send to repair | Record the repair vendor, optional RMA or ticket reference, expected return, and notes. The current assignee stays recorded while the asset's status changes. |
| Mark lost / stolen | Record what happened, when and by whom it was reported, any police reference or remote action, and whether a replacement is needed. The assignee is cleared. |
| Retire / dispose | Record the disposal method, optional recipient, final location or certificate reference, and notes. The assignee is cleared. |
| Reactivate | Return a retired or disposed asset to active inventory. Choose the target status and add a note. |
Adding a newly received asset? Use + Add Asset; there is no separate Receive workflow. Doing a physical inventory? Open Assets → Audit Scan; it is a separate page, not an option in the single-asset workflow menu.
Frequently asked questions
Do I need permission to run a workflow?
Each workflow has its own capability on the Asset Permissions screen. If your organization has turned on permission enforcement, you need the matching capability to run that workflow. If enforcement is off, workflows are available as before. See Asset Permissions for details.
Can I return more than one asset at once?
Return appears in the row menu, asset detail, and bulk action bar, but the bulk dialog currently handles only the first selected asset. Repeat the action for each remaining asset and verify their statuses individually.
What does the due-back date do?
The due-back date records when you expect an assigned asset to come back. It is stored with the assignment and shown in the asset's history, so you have a reference point when you are following up on outstanding equipment.
The asset's status did not change — why?
Assign and Return choose statuses from your organization's configured asset statuses. If a status looks wrong, reopen the asset and confirm the new custody-history entry. If you started from a bulk selection, remember that only the first selected asset was processed.